Showing posts with label Clothing. Show all posts

Friday, November 19, 2010

Project #11: Sew a Child's Chef Hat

I was looking for a fun child's gift for nieces and stumbled upon this cupcake gift set, currently on sale for about $6 at Bed, Bath, and Beyond. That reminded me that I had snagged a free project pattern at Joann's recently for a child's chef hat. I decided that, if I combined those items with a box of cake mix and a can of frosting, I just might have a really cute gift bag for a birthday at a very reasonable price! What child doesn't love baking??


So I got to work on the chef hat project (the apron wasn't needed since one is included in the gift set). I had to read the instructions a couple of times to figure out exactly what was being described in the instructions. I have to admit that once I understood, I used the given dimensions but opted to go a slightly different route on assembly so as to avoid having to hand sew the facing seam. I'll outline how I did it below, and you have the original instructions linked above. Choose your own route! It took me about an hour to assemble two hats. With basic sewing skills, this was very easy.

Sew a Child's Chef Hat

Materials:
  • 5/8 yard white fabric (I used home dec fabric, which has a nice weight)
  • 3" length of 1"-wide elastic
  • 5" x 22" piece of fusible interfacing
  • thread
Equipment:
  • Iron
  • Sewing machine
Time: One Night
Cost: Under $20
Instructions:
  1. Cut a 22" diameter circle for the hat and a 5"x22" rectangle for the band.

  2. (Optional) Embroider (or use iron-on embellishments) on the band (as shown below).
  3. Iron fusible interfacing to back of band.
  4. With right sides together, sew band together at narrow ends, using 5/8" seam.
  5. Press seam open.
  6. With right side out, fold band in half lengthwise, all the way around. Press.
  7. At back seam, insert 3" piece of elastic so that it lays centered (lengthwise) at the base of the the band fold.
  8. Stitch the center of the elastic in place by top-stitching in the band seam. (This will create a seam in the middle of your elastic.)
  9. Sew one end of elastic three inches from the center seam. Stretch elastic so that fabric lays flat, and stitch down the center of the elastic back to the band seam. Release. Fabric will gather as elastic pulls up. Repeat for other end of elastic.


  10. Using a high-tension, long-length stitch on your machine, gather edges of circle about 1/4" from the edge.
  11. With right sides together, pin hat to band (at raw edges), spacing as evenly as possible. Pin frequently.
  12. Sew a 5/8" seam around hat base to attach to the band.
  13. Turn right-side out and press.

  
This was a fun project, and now I can't wait to give these to my nieces! (Shhh!) Don't tell them what they're getting!

Do you have any themed kids' gifts, like this baking-themed bag of treats? With the holidays fast approaching, we're all looking for original and creative ideas! Feel free to share some of your own!


Friday, October 29, 2010

Project #7: Clean Out the Clothes

During our last move, we didn't have a lot of time to go through our closets before we packed or after we unpacked. Needless to say, we had accumulated a great deal of clothes that had either gone out of style, seen their better days, or no longer fit. For some time, we kept two giant moving boxes in our room and just tossed stuff in them (eventually on top of them) when it met one of these qualifications. We had been putting off taking them to Goodwill because we wanted to itemize them for tax purposes.

Well, I had just about had it with the two boxes of clothes. I had decided to forget about the writeoff in favor of less clutter. Except the boxes had gotten so big that me and my pregnant self couldn't lift the boxes any longer. So something had to be done.

I started to consider my options, and I decided to take a couple of routes. Here's what I did:
  1. Dump out all the clothes on the floor. I had to see what I had in order to make any progress.
  2. Pick out items that could be consigned. I have never done this before, but the process was fairly painless and carefree. My clothes were already clean and folded; I just gave them a quick press and a hanger before running them to my consignment appointment. I placed 20 items in the store for the fall; we'll see in January how they did. The drop-off process took all of five minutes! I've got another stack going to drop off for the spring sale. (Consignors usually limit how many items you can drop off during each season.)
  3. Grab the worn-out items and throw them in a trash bin! If I wouldn't wear it in its current condition, why would anyone else? No need to donate junk that someone else is going to have to weed through.
  4. Donate everything else! Fold and pack items in small, easily manageable boxes or bags that can be easily lifted in and out of your car.
  5. Drop everything off at its final destination!
In calling local consignment shops, I was disappointed to find that men's clothes aren't accepted by any of my stores. Most specialized in children's clothing, and with one little girl and another one on the way, I can't see getting rid of any of that yet. But one day, I'll have plenty to consign! And bonus: the local consignment shops donate all items that don't sell at the end of your sale period, so there's no need to go pick up leftovers and drive them over to Goodwill. Just stop by and pick up your check!

I think I waited a little too long to get to this project. I'm going to try to be more devoted to this moving forward. For this reason, I placed two large, labeled bins in the floor of my closet: (1) Donate and (2) Sell. Now when I (or anyone else) comes across something that needs to go, we'll put the item directly in the appropriate box, folded and ready to go. When a box is full, I'll deal with it individually instead of having to repeat steps 1-5 above. And now, clothing that's just had it goes straight to the trash can.

Whew! I already feel better. And my room looks better. At least that corner of it.

How often do you go through your clothes? Do you have any way to turn the unwanted items into a bit of extra cash? Ever had any luck selling at yard sales? Do share!

Jennifer

Friday, October 8, 2010

Project #5: Applique a T-Shirt

Fall is in the air, and what better way to welcome the change in seasons but to celebrate with candy corn? Rather than going down to the grocery store and purchasing numerous scores of that deliciously sweet confection, I decided to celebrate with what else, but a project!

Last spring, I bought my daughter a long-sleeve orange t-shirt on clearance for about $2. Okay, I actually bought two. I also found some black pants with yellow, orange, and white polka dots. $4. All that was missing was the touch of fall. I decided to try my hand at applique, which I've never done before. After all, what's cuter and looks nicer than a well-done applique on children's clothing?

I knew my sewing machine had to be capable, but I still needed to do some trials and figure out the best method for actually sewing shaped fabric to the shirt. So off to the trials I went...

I started by trying to find a stitch on my machine that would give the effect I wanted. Some appliques look like a small zigzag, allowing some visibility of the raw edge of the stitched-on shape. Others use a "blanket stitch" look along the edge of the shape. I was looking for a solid, wide stitch that would totally cover the edge of my shape and provide a bold outline of my shape. On my machine, that called for setting a wide zig-zag stitch and then making the stitch length very short. On other machines, it meant selecting the "base" of the button hole stitch (the one that is wide and solid).

Next, I tried my stitch on a couple pieces of fabric. I found immediately that stitching that frequently on a piece of cotton fabric caused it to pucker; reinforcement was definitely needed. I also found that "steering" the fabric through the machine was challenging. The rate, speed, and direction of the stitches had a large impact on the outcome of the appliqued shape. It is particularly important to figure out how to do your curves, points, and sharp angles before you begin your actual project, so be sure to practice those. I highly recommend the practice sessions before beginning your actual project!

This is super-easy. I completed the whole project in one night, and it definitely cost under $10.

Applique a T-Shirt

Materials:
T-shirt or other garment
spray adhesive
lightweight iron-on interfacing (scraps)
scrap fabric for applique shape
coordinating thread

Cost: Under $10
Time: One night
Instructions:
1. Iron your t-shirt to remove all wrinkles.
2. Select an applique shape and cut it out of your scrap fabric. Sew together as needed. (For the candy corn, I got some orange, yellow, and white cotton. I sewed three strips together and then cut the candy corn shape out of the resulting rectangle.)
3. Iron the applique shape flat.
4. Iron lightweight interfacing to the BACK of the applique shape. Trim excess to the exact size of the shape.
5. Turn t-shirt inside out.
6. Cut a piece of lightweight interfacing slightly larger (1/2" - 1" all around) than the applique shape.
7. Iron the larger piece of lightweight interfacing to the INSIDE of the t-shirt in the location where the applique shape will be sewn.
8. Turn t-shirt right-side out.
9. Lightly spray the back of the applique shape with adhesive.
10. Place the shape on the t-shirt.
11. Applique shape to t-shirt using the desired stitch.


Applique looks great on home decor, clothing, and other items! (Think Christmas gifts!!) I'm thinking of adding applique flowers, hearts, and other shapes to more shirts, dresses, and pants for my daughter. Maybe a throw pillow with an initial. What else will you applique?

Thursday, September 2, 2010

Project #1: Sew a Pillowcase Dress

One of the most popular, simple, and cute (!!) sewing projects out there is the pillowcase dress. Made from a pillowcase (or scrap of 45" wide fabric), some ribbon, and a few sewing notions, it's fairly cost effective, too.

I combined several patterns I found online to create my own pillowcase dress.  I like this resulting set of instructions because it creates a really nice, finished armhole; the elastic across the front and back creates uniform gathering; and the ribbons stay put on the shoulders very well. It may or may not be an original pattern itself, but here's what I did. I'm pretty pleased with the results!


Materials Needed:
  • One standard pillowcase OR one piece of 45"-wide fabric (lengths vary; see step 2 for more info)
  • Two yards of 7/8" wide (or wider) grosgrain ribbon, cut into four equal lengths (for smaller sizes, 14" each is sufficient; larger sizes will use the entire 18" length)
  • 1/2" yard of 1" wide elastic
  • 1 yard of coordinating single-fold bias tape
  • Coordinating thread
  • (Optional) Additional beading, ribbon, cording, rick-rack, or other embellishments to adorn dress
Cost: Less than $20
Time to Complete: One night
Instructions:
  1. Purchase a pillowcase. (Or, as I did, find a scrap of 45" wide fabric from a past sewing project. With right sides together, stitch the sides together and sew a hem at the bottom. There is no need to finish the top edge at this time.)
  2. Cut your pillowcase, measuring from the hemmed dress bottom, upward. (You'll cut off the closed end of the pillowcase, or the unfinished edge of your scrap.) Use the list below to determine the cut length for your dress size.
    • 6/9 months: 16"
    • 12 months: 17.5"
    • 18 months: 19.5"
    • 2T: 21.5"
    • 3T: 23"
    • 4T: 24"
    • 5/6: 26"
    • 7/8: 28"
  3. On the unfinished edge, with the dress turned inside out, turn down 3/4". Press.
  4. Turn down an additional 1-1/4" on the same end. Press.
  5. With dress laying flat (seams on sides), cut J-shaped armholes out of the top corners. For smallest sizes (6/9 mo - 18 mo), use a J shape that is approximately 1-3/4"w x 2-1/4"h. For medium sizes (3T and under), use a J shape that is approximately 2-1/2"w x 3"h. For larger sizes, use a J shape that is approximately 3"w x 4"h. (You will cut off part of the tubing that was created in steps 3/4.)
  6. Open the last fold of the tubing.
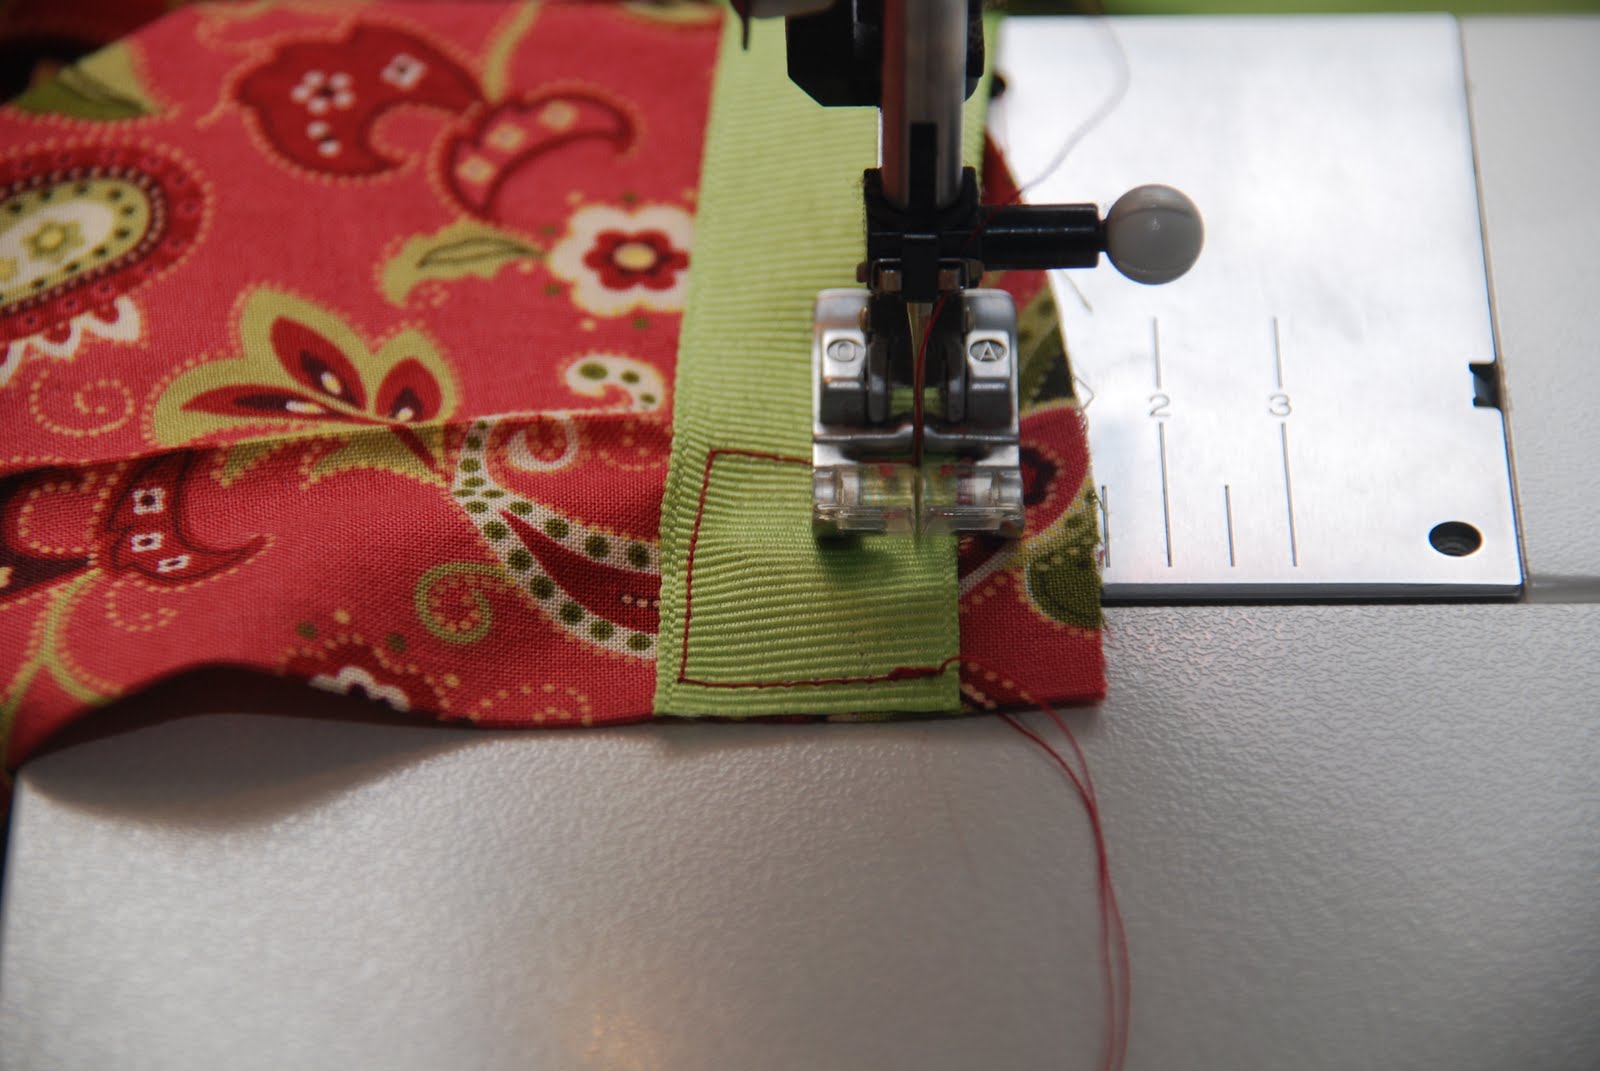
  7. Place and stitch the four strips of ribbon to the casing back, as shown. Place the right side of the ribbon face down on top of the opened tubing, with the length of the ribbon extending down the length of the dress. (To test your placement of the ribbon, pin the ribbon and refold the tubing/casing. The ribbon should extend upward to form the shoulder strap of the dress.) Leave 1/2" to the outside of each ribbon. Attach ribbon by stitching in a rectangle, to ensure greater durability.
  8. Fold the tubing back down. Stitch the tubing down on the front and back of the dress to form a casing (tube). Stitch as close to the edge of the tubing as you can without going off onto the dress front.
  9. Cut two pieces of 1" elastic, in the lengths shown below. (You can also measure your child to obtain the correct measurement. Measure across the chest. This will be the width of the top-most part of the dress.)
    • 6/9 months, 12 months: 5"
    • 2T, 3T: 6"
    • 4T, 5/6: 7"
    • 7/8: 8"
  10. Using a large safety pin as a guide, thread the elastic pieces down the front casing (tube). When the back end of the elastic is about 3/8" from the end of the casing, stitch it down. Stitch across the entire casing, catching the end of the elastic. You will want to reinforce this seam by stitching across three or four times. Continue threading elastic, stitching the other end of the elastic 3/8" from the other end of the casing.
  11. Repeat for the back casing.
  12. Cut a piece of single-fold bias tape for each of the armholes, allowing 1/2" extra on the ends of each armhole.
  13. Open up one side of the bias tape. Pin the right-side, open-side of the bias tape to the right side of the armhole. Remember to leave about 1/2" of extra bias tape on the end of each armhole.
  14. Stitch in the fold of the bias tape.
  15. Refold the bias tape. Turn the folded bias tape to the inside of the dress. Press, making sure to allow a little of the dress print to extend around the fold to the inside of the dress. (This keeps the bias tape from showing on the outside of the dress.)
  16. Open the recently pressed bias tape fold. Fold/tuck the extra ends of the bias tape down so that the resulting fold is flush with the top of the dress casing. Replace the bias tape fold. Stitch down the bias tape, along the armhole opening.
  17. Repeat steps 12-15 for the other armhole.
  18. To finish, tie front left shoulder ribbon to back left shoulder ribbon. Tie front right shoulder ribbon to back right should ribbon.
  19. Embellish the dress with trim, beading, embroidery, etc. as desired.
What about you? Have you made your own pillowcase dress? What tips can you share?